


Table of Contents
- What Roses Need to Thrive: Sun, Soil, and Drainage
- Watering Roses: How Often and How Much
- How to Prune Roses for Healthier Blooms
- Feeding Your Roses: Fertilizer Schedules and Soil Health
- Watering Roses in Pots: Container Care That Works
- Rose Bush Winter Protection: Preparing for Dormancy
- Pests, Diseases, and Troubleshooting Visual Symptoms
- Frequently Asked Questions
Last Updated: September 13, 2026
What Roses Need to Thrive: Sun, Soil, and Drainage
To care for roses, give these flowering shrubs at least six hours of direct sun, well-drained soil, and consistent moisture so they bloom reliably. Get those three basics right and most disease problems never start.
Sunlight drives everything. Without enough of it, roses stretch toward the light, produce fewer blooms, and stay wet longer after rain, which invites fungal trouble. Aim for a spot that gets morning sun specifically; it dries dew off the foliage early.
Soil comes next. Roses want a loose, well-drained mix rich in organic matter, with a soil pH between 6.0 and 6.8 (Soil: Understanding pH and Testing). Heavy clay holds water against the root system and suffocates it. If your soil drains slowly, dig in compost and coarse grit before planting rather than after.
Drainage is the part most guides gloss over. A rose planted in a low spot that stays soggy will decline no matter how well you feed it. Test by digging a 30 cm hole, filling it with water, and checking how long it takes to empty. If it’s still full after several hours, plant elsewhere or build a raised bed. The Royal Horticultural Society guide to soil drainage explains the jar and hole tests in more detail.
Morning sun plus fast drainage prevents more rose problems than any spray or fertilizer you can buy.
Watering Roses: How Often and How Much
When you care for roses, water them deeply once or twice a week rather than lightly every day. A mature bush needs roughly 4 to 8 litres per watering, delivered to the base of the plant, not the leaves.
Frequency depends on your soil and the weather. Sandy soil drains fast and may need water every three or four days in summer. Clay holds moisture longer, so twice a week is usually enough. During a heat wave, check the top 5 cm of soil with your finger; if it’s dry at that depth, it’s time to water.
The method matters as much as the schedule. Soak slowly so water reaches the root system instead of running off. Drip irrigation or a soaker hose beats a sprinkler because it keeps foliage dry, which directly reduces black spot and powdery mildew pressure. Water in the morning when you can, so any splashed leaves dry before evening.
Container roses and garden roses follow the same principle, but pots dry out far faster. More on that below.
How to Prune Roses for Healthier Blooms
Pruning roses is the practice of removing dead, damaged, and crossing canes to redirect the plant’s energy into strong new growth and repeat blooming. Done correctly, it also opens the center of the bush so air moves through and foliage dries faster, which is the single cheapest defense against black spot and powdery mildew.
Timing depends on rose class, and getting this wrong is the most common reason a rose skips a season of bloom.
- Hybrid teas, floribundas, grandifloras, and most shrub roses: prune in late winter or early spring while the plant is still dormant, just as buds begin to swell. In most of the country that window falls between late February and mid-April, depending on your zone. Prune too early and a hard freeze kills the new cuts; prune too late and you cut off the season’s flower buds.
- Climbing roses and ramblers: prune after their first flush of bloom, not in spring. These flower on last year’s wood, so dormant pruning removes the canes that would have produced flowers. Thin out old canes after the June flush and tie in new ones.
- Once-blooming old garden roses: same rule as climbers, prune right after flowering.
- Repeat-blooming modern roses: a light deadheading through the season plus the main dormant prune is enough.
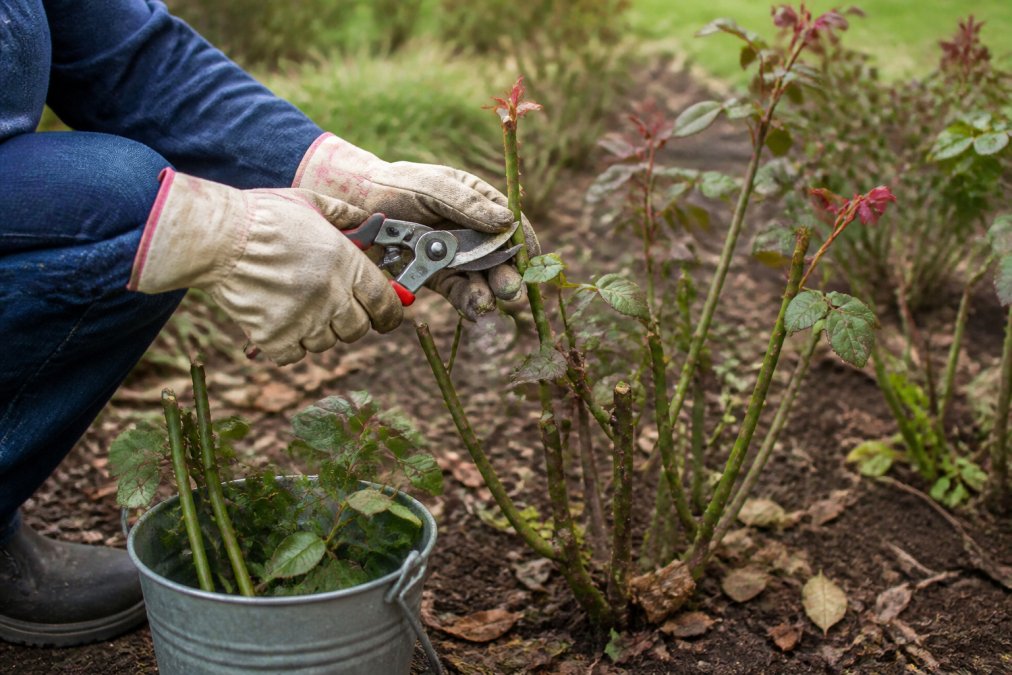
The cut itself is where beginners slip up. A common mistake is cutting too far above the bud, leaving a stub that dies back and invites disease. Make a clean cut roughly 5 mm above an outward-facing bud, angled away from it, so water runs off the cut surface rather than pooling in it. The bud you cut above determines the direction the new cane grows, choose an outward-facing bud to push growth away from the center of the bush.
Tool choice matters more than most guides admit. Bypass pruners make a clean slice because the blade passes the hook. Anvil pruners crush the cane between a blade and a flat plate, leaving a ragged wound that heals slowly. For canes thicker than a pencil, use loppers rather than forcing the pruners. Keep the blade sharp, a dull blade bruises tissue the same way an anvil does.
Work in this order:
- Remove anything dead, diseased, or broken first. Cut back to healthy white or green pith; if the center is brown, keep cutting until it isn’t.
- Cut out canes that rub against each other, keeping the stronger one.
- Thin the center so light and air reach inside the bush.
- Shorten the remaining healthy canes to shape the plant, aiming for an open vase silhouette.
- Clean up all pruned material from the ground, fungal spores overwinter in fallen canes.
Sterilize your blades between plants with rubbing alcohol or a 10 percent bleach solution. It takes seconds and stops you spreading disease from one rose to the next, which matters most when you’re pruning a sick bush next to a healthy one.
Cutting back more than a third of the plant at once shocks it into producing weak, sappy growth that aphids target first. Prune gradually over a season instead, and never prune a stressed or newly planted rose hard in its first year.
A useful habit is to step back every few cuts and look at the whole bush. The goal is not a tidy shape, it’s a plant with an open center, strong outward-facing canes, and no dead wood. If you can see through it, you’ve pruned it well.
Feeding Your Roses: Fertilizer Schedules and Soil Health
Roses are heavy feeders, and a consistent schedule beats occasional heavy doses. The three nutrients that matter most are nitrogen for leafy growth, phosphorus for root and flower development, and potassium for overall vigor and disease resistance.
A practical approach: feed once when new growth appears in spring, again after the first bloom cycle, and a final time in midsummer. Stop feeding by late summer so the plant can harden off before dormancy. A balanced rose fertilizer or a slow-release granular product applied around the drip line works well for most gardeners.
Soil health underpins all of it. Top-dress with compost each spring and mulch with 5 to 8 cm of bark or straw. Mulch does three jobs at once: it holds moisture, suppresses weeds, and keeps soil temperature steady. Keep mulch a few centimeters clear of the graft union so it doesn’t trap moisture against the stem.
If leaves look pale with green veins, the soil pH may be off and locking up nutrients. A simple soil test tells you what to adjust.
Watering Roses in Pots: Container Care That Works
Container roses need more frequent watering than garden roses, often daily in summer, because a pot’s soil volume dries out quickly. Check containers every morning during warm weather and water until it runs freely from the drainage holes.
A few rules keep potted roses healthy:
- Use a pot at least 40 cm across with proper drainage holes
- Plant in a quality potting mix, not garden soil, which compacts in containers
- Water until the soil is fully saturated, then let it drain completely
- Never let the pot sit in a saucer of standing water
- Feed more often than garden roses, since nutrients leach out with each watering
Terracotta dries faster than glazed ceramic or plastic, so adjust your schedule to the pot, not the calendar. In winter, containers are more exposed to freezing than ground-planted roses, so move them against a sheltered wall or into an unheated garage.
Rose Bush Winter Protection: Preparing for Dormancy
Rose bush winter protection starts with understanding dormancy, the period when a rose stops growing and conserves energy through cold weather. Your goal is to keep the plant cold and stable, not warm. Fluctuating freeze-thaw cycles do more damage than steady cold.
Stop fertilizing by late summer and let the plant wind down naturally. After the first hard frost, mound soil or compost around the base of the bush to roughly 20 to 30 cm, covering the graft union. In colder regions, wrap the mound with burlap or leaves for extra insulation. The Canadian Food Inspection Agency plant hardiness resources can help you confirm what your zone supports.
Container roses need the most attention. Their roots sit above the frost line, so insulate the pot itself by wrapping it in burlap or bubble wrap, or sink the whole container into the ground for the winter. Water occasionally on mild days so roots don’t dry out completely.
Wait until early spring to remove protection. Uncovering too early exposes tender new growth to a late freeze.
Pests, Diseases, and Troubleshooting Visual Symptoms
Most rose problems announce themselves visually, and matching the symptom to the cause saves you from spraying the wrong thing. This is the diagnostic section most guides skip, they list pests and diseases, but they don’t help you read a leaf. Here’s how to work backward from what you see.
| Symptom | Likely Cause | First Response |
|---|---|---|
| Black spots with yellow halos on leaves | Black spot fungus | Remove affected leaves, improve airflow, water at the base |
| White powdery coating on leaves | Powdery mildew | Increase sun exposure, space plants, apply fungicide if severe |
| Clusters of small insects on new growth | Aphids | Blast with water, introduce ladybugs, use insecticidal soap |
| Holes chewed in leaves | Beetles or sawfly larvae | Handpick, apply targeted organic spray |
| Yellowing leaves with green veins | Nutrient lockout or high pH | Test soil, adjust pH, feed appropriately |
| Leaves curling and cupping downward | Herbicide drift or aphid pressure | Check nearby lawn treatments, inspect undersides of leaves |
| Cane turning brown from the tip down | Cane borer or winter dieback | Prune below the discoloration, sterilize blades between cuts |
| Fine webbing on leaves in hot weather | Spider mites | Raise humidity, spray undersides with water, use insecticidal soap |
| Buds balling up and not opening | Thrips or prolonged wet weather | Shake buds, remove affected ones, treat for thrips if recurring |
| Sudden wilting of one cane | Root rot or cane borer | Check drainage, prune the cane to healthy tissue |
The mechanism behind most fungal problems is the same: spores need leaf wetness for several hours to germinate. Black spot spores, for example, need roughly seven hours of continuous moisture on the leaf surface to infect. That’s why watering at the base, spacing plants, and pruning for airflow do more than any spray, they remove the condition the fungus needs, not just the fungus itself.
On the organic versus synthetic question, treat it as an escalation ladder rather than a binary choice.
Start with cultural controls. Water at the base, keep foliage dry, prune for airflow, and clean up fallen leaves so fungal spores don’t overwinter in the soil. This alone prevents most black spot and powdery mildew in home gardens.
Move to organic controls for light infestations. Neem oil, insecticidal soap, and horticultural oil work on contact and break down quickly. They’re most effective against soft-bodied insects like aphids, thrips, and spider mites, and they’re safe for pollinators once dry. Beneficial insects, ladybugs, lacewings, parasitic wasps, establish slowly but reduce pest pressure season after season. Release them in the evening and stop spraying for a week afterward so you don’t kill what you just bought.
Reserve synthetic products for severe outbreaks. They act faster and have longer residual activity, but they can harm pollinators and beneficial insects if applied when flowers are open or bees are active. If you use one, apply in the evening, avoid open blooms, and follow the label rate exactly, more is not better and can burn foliage.
A weekly five-minute walk through the garden with a hand lens catches most problems at the stage where a strong water spray or a squirt of insecticidal soap solves them. By the time damage is obvious from standing height, you’re already in escalation territory.
If you’ve received roses as a gift and want to keep them going, cut stems at an angle under running water, change the water every two days, and keep the vase out of direct sun. Potted gift roses can be transplanted outdoors once they’ve acclimatized, move them to a shaded spot for a week first, then gradually into sun over another week, and water them in well at planting.
Frequently Asked Questions
How often should you water roses?
Water deeply once or twice a week, giving each plant about 4 to 8 litres so moisture reaches the root system. Potted roses dry out faster and may need daily watering in summer. Always check the top 2 to 3 cm of soil first; if it is dry, it is time to water. Avoid light, frequent sprinklings, which encourage shallow roots and disease. Morning watering lets foliage dry before evening and reduces black spot risk.
What will coffee grounds do for roses?
Coffee grounds add organic matter and small amounts of nitrogen to the soil, which supports healthy foliage and blooming. Work used grounds into the top layer of soil or add them to compost rather than piling them thickly around the base, where they can mat and block drainage. They also slightly lower soil pH, which suits roses in the 6.0 to 6.5 range. Use them as part of a balanced feeding routine, not as a complete fertilizer.
Should you cut off roses after they bloom?
Yes. Deadheading, or removing spent blooms, redirects the plant’s energy into new growth and repeat blooming rather than seed production. Cut the stem back to a five-leaflet leaf just above an outward-facing bud. For shrub roses and climbing roses, regular deadheading through the season keeps flowers coming. Stop deadheading in late summer for varieties that form hips, which add winter interest and feed birds.
How do you prune roses for winter protection?
In late fall, after a few hard frosts but before deep freeze, cut canes back to about 30 to 45 cm and remove any dead, damaged, or crossing branches. Clear fallen leaves and debris from around the base to remove overwintering pests and black spot spores. Mound soil or compost 20 to 30 cm over the crown, then add mulch once the ground freezes. This protects the graft union and root system through dormancy.
Roses reward attention more than expertise. Get the sun, drainage, and watering rhythm right, and the rest follows with far less effort than most people expect. When you’d rather leave the growing to someone else, Brampton Florist hand-designs fresh arrangements for every occasion, from sympathy flowers to anniversary gifts, with convenient online ordering and same-day delivery across the area. Order online or call now to order flowers and let our designers handle the details.


